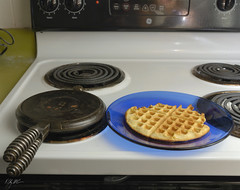
My dad is an interesting personality. One of his most fascinating abilities is the knack for finding really cool junk and restoring it to it's former glory. The waffle iron pictured is just one of his many findings. After sanding and cleaning the shnarf out of it he proceeded to season the cast iron by a process of heating, greasing, cooling, wiping and repeating again until the cooking surface was nice and shiny. He then had the brilliant idea of sending it to his wayward daughter in Hawaii (me!).
Clay and I love to make nice hearty breakfasts on weekends, we used to just do pancakes but would have to go out when the craving for waffles hit! However, once the waffle iron arrived it was full speed ahead to the land of waffle making!
Our first time trying the classic cast iron waffle maker was, umm, bumpy. I think we got roughly two half decent waffles out of it and spent at least an hour picking out toasted waffle bits from the iron.
Feeling a little disgruntled and very stubborn we tried the iron again the following weekend with a LOT more success. I've found the key is to keep BOTH sides heated. To start the process (while making the recipe) I turn on two burners to medium heat and gently coat both halves (I'm not sure when my particular iron was made but this version comes apart) with either Pam or butter. Once they are nice and toasty warm I pour on roughly a quarter cup of the waffle batter (I just use a good ol' Joy of Cooking recipe), place the second half on top and gently set it down so that batter doesn't go squirting out all over the place, although I am pretty good at doing that too! Once the batter is in (this is important) Leave it alone! Leave the burner on medium-low and let it sit for 3-4 minutes, then flip so that the other side becomes heated again. Let it sit until the waffle easily comes off of the top half. Once that happens it should be done. The first time we did it this is where I messed up and lost patience.
I've found that when cooking or baking it is best to find yourself that zen state or else there will be mad explosions of flour, sugar and batter to clean up, or just a lot of picking at crispy remnants of waffle in a hot waffle iron. Wee!
Once you have successfully removed the waffle, start the process again. I've found that alternating the side that the waffle iron is on is the best way to keep both halves hot enough to cook! By the end I had a stack of lopsided golden brown waffles and a hungry boyfriend. But as soon as the waffles disappeared at an alarming rate, the hungry boyfriend turned into a happy cuddly boyfriend. And me? After all the flipping and flopping of the waffle iron (and the mini weight work out that comes along with it), I stand resolute that there is nothing better than eating homemade from scratch waffles in the morning!
Thursday, May 14, 2009
Tuesday, May 12, 2009
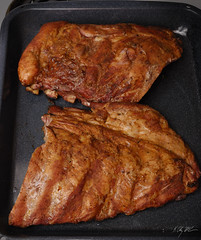
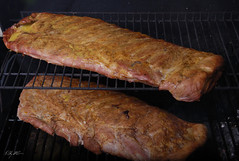
Memphis-Style Pork Spareribs
Hi everyone! My name is Clay, and I would like to thank Philip for inviting me to contribute to this blog. I like to dabble with new and interesting recipes, and I also like to play around with my camera.
This dinner was a "thank you" to Serena's former roommates and to those who helped move her in to her new place. The dinner was BBQ themed, and the menu consisted of these ribs, baked beans from scratch, and fresh coleslaw.
I've enjoyed ribs before, but had never attempted them on my own. I knew that the key was long, low, and even heat, and I am very grateful to the Epicurious information on indirect grilling.
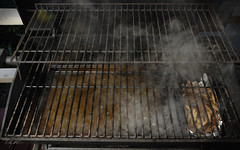
I applied the principles to our low-budget propane gas grill. Basically, just put a baking sheet under where the meat would be (as far from the heat as possible), and place a basket of hickory wood chips over the burner with the flame on. Lesson for next time: Keep the water in the baking sheet, soak the chips for longer (they actually flamed up and produced some ash inside the grill), and keep the heat even lower (I had the gas set to "medium").
The rub and grilling directions can be found here. In addition to the ingredients listed, I followed a user suggestion and added a dash of cinnamon.
I trimmed and rubbed the racks in the morning before heading to campus; then I wrapped them in foil and let them cure for about seven hours until I got home and fired up the grill.
It has always been my experience that meat objects coming off the grill should be "wet" in some way. Chicken should have a BBQ sauce applied, Tri-tips should be still sweating, etc.
This history is likely what motivated me to mix up the "mop sauce" and brush it on after an hour of cooking (about halfway through the process). Not a BBQ sauce nor a marinade by any stretch of the imagination, I was dubious about how this acrid, pale, thin liquid would contribute to my masterpiece. In the end, however, I had to bring the excess mop sauce out to the dinner table because the guests couldn't get enough to brush on their dry-rubbed ribs.
This dinner was a "thank you" to Serena's former roommates and to those who helped move her in to her new place. The dinner was BBQ themed, and the menu consisted of these ribs, baked beans from scratch, and fresh coleslaw.
I've enjoyed ribs before, but had never attempted them on my own. I knew that the key was long, low, and even heat, and I am very grateful to the Epicurious information on indirect grilling.
I applied the principles to our low-budget propane gas grill. Basically, just put a baking sheet under where the meat would be (as far from the heat as possible), and place a basket of hickory wood chips over the burner with the flame on. Lesson for next time: Keep the water in the baking sheet, soak the chips for longer (they actually flamed up and produced some ash inside the grill), and keep the heat even lower (I had the gas set to "medium").
The rub and grilling directions can be found here. In addition to the ingredients listed, I followed a user suggestion and added a dash of cinnamon.
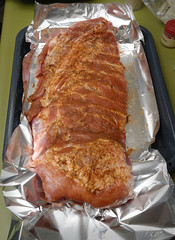
I trimmed and rubbed the racks in the morning before heading to campus; then I wrapped them in foil and let them cure for about seven hours until I got home and fired up the grill.
It has always been my experience that meat objects coming off the grill should be "wet" in some way. Chicken should have a BBQ sauce applied, Tri-tips should be still sweating, etc.
This history is likely what motivated me to mix up the "mop sauce" and brush it on after an hour of cooking (about halfway through the process). Not a BBQ sauce nor a marinade by any stretch of the imagination, I was dubious about how this acrid, pale, thin liquid would contribute to my masterpiece. In the end, however, I had to bring the excess mop sauce out to the dinner table because the guests couldn't get enough to brush on their dry-rubbed ribs.
Monday, May 11, 2009
The Return Of The Nutella Brioche Rolls
OK so I felt like there was room for improvement on the first round of these, that's my excuse and I'm sticking too it!


Anyway, I switched out the original Brioche recipe for this one. Mmmmmm Brioche, even the dough looks tasty, see!
The rest was the same as before except that I packed them a little closer together in the tray so they're more like rolls and less like flats.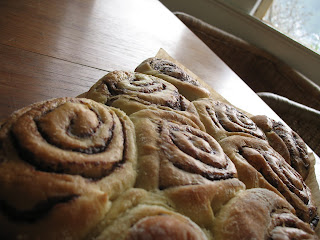
Plus I took a process pic so everyone can drool at the image of a small field of Nutella. I wonder if that's like candy-floss farming? Someone ask Zapper.
The rest was the same as before except that I packed them a little closer together in the tray so they're more like rolls and less like flats.

Plus I took a process pic so everyone can drool at the image of a small field of Nutella. I wonder if that's like candy-floss farming? Someone ask Zapper.

Saturday, May 9, 2009

Subscribe to:
Posts (Atom)